Categories
Applications Using Linux Your Choice

Favorite Linux Apps: Photo & Image

Linux Gui Applications for Photos and Image-based tasks

If you like to store your digital photos in “album-style” format, then I recommend Digikam.  It’s a KDE-based app so I suggest installing it using Synaptic on Debian-based systems.  Let Synaptic fetch other files as needed.  This saves you the headaches of “dependency hell”, which happens when an app you wish to install needs additional files and you have no idea which ones, where to find them, or how to properly install them.

To manipulate photos and images (such as cropping, or layering text captions onto them) I suggest you install the GIMP if it’s not there by default.  To find out if you have it, you can check your Applications menu or issue the following command in a terminal

which gimp

If the shell returns something like “/usr/bin/gimp“, then its installed.  If it returns nothing, you’ll need to install it.  The GIMP also does scaling (resizing images while keeping the aspect ratio) and is the closest freeware knockoff of Adobe Photoshop to my knowledge.

When I say “closest” I implore you to decide for yourself if your tasks can be done with free software.  The GIMP has a lot of great features such as transparency, layers, gradients, and more; but IT IS NOT CAPABLE of replacing Photoshop if that’s what your work requires.

If you’re doing commercial graphical work, your software choice (and budget) should be “an investment” and not “an expense”.  For many personal uses, the GIMP may be able to give you professional-looking results.
Categories
Applications Using Linux Your Choice

Favorite Linux Apps: Text Editors

Linux Gui Applications to write and edit text

For simple stuff I recommend Gedit that comes with GNOME-based Linux distros.  If you’re running a K-Desktop Environment (KDE) then Kate is really good.   Gedit works well for writing quick text snippets or copying text from websites to use later on.

For text writing in general, I like Pyroom which came pre-installed with Crunchbang Linux 9.04 and I happen to be writing this very blog post using Pyroom.  Pyroom reminds me of a typewriter interface—everything else on the screen (except for your text and a light border) is invisible.  Nothing to distract your eyes.  You only see the words that you type (non-formatted) on your (virtual) page.  Each time you hit “return”, your work just scrolls upward.  And it can “auto-save” your work at intervals that you set in preferences.

If you’re going to write scripts in various programming languages, then you’ll need a decent IDE-style code editor.  This comes in handy if you’re building a website, because you can create a “project” file that will group together the text-based files related to your website.

For this type of work, I use Geany, but have recently installed Aptana Studio to try it out.

The benefit of an IDE-style editor is that it can color the syntax so your commands don’t look like a big vat of text.  This makes reading, writing, documenting (or “in-code comments”) and troubleshooting your work much much easier.

Categories
Applications Your Choice

Favorite Linux Apps: Burning disks

Linux Gui Application to Burn CDs/DVDs

Depending on your Linux distribution, you already have an application capable of burning Data CDs for file/folder backups and Music CDs.  Most of them offer the ability to burn an .iso file.

I usually install K3B (KDE-based) for disk burning.  Install k3b with Synaptic package manager:  type “k3b” [no quotes] after clicking the “Search” button.  If you’re using a non-KDE System, let Synaptic install any extra items.

I prefer k3b because I find it more reliable than other burning software that may come bundled with a distro.  I won’t name applications, but for one reason or another they disappointed me, even though community opinion of them is high.

There are times when you just have to trust your instincts and experiences.

When something works for you, use it.  If it gives you headaches, then seek alternatives.

That’s the benefit of choice.

Categories
Desktop Environments Your Choice

Openbox Desktop Environment

[UPDATE TO POST] Hello, my apologies, but I have made a silly error in calling Openbox a Desktop Environment.  Openbox is not a desktop environment, Openbox is a Window Manager.

I feel I made that mistake for a few reasons:

  1. My current distro, CrunchbangLinux, runs Openbox with other apps such as a system tray & taskbar.  This “combination of apps” compose the desktop environment.
  2. For fast performance, you simply run Openbox without an overall Desktop Environment.
  3. Without a desktop environment, I thought Openbox was the desktop environment.

Openbox provides a “Minimalist Environment”.  For example, Openbox does not put icons on a user’s Desktop.

Here are some screen shots from my Openbox Environment on my Dual-boot laptop (MacBook).

Openbox Desktop Environment in Crunchbang Linux
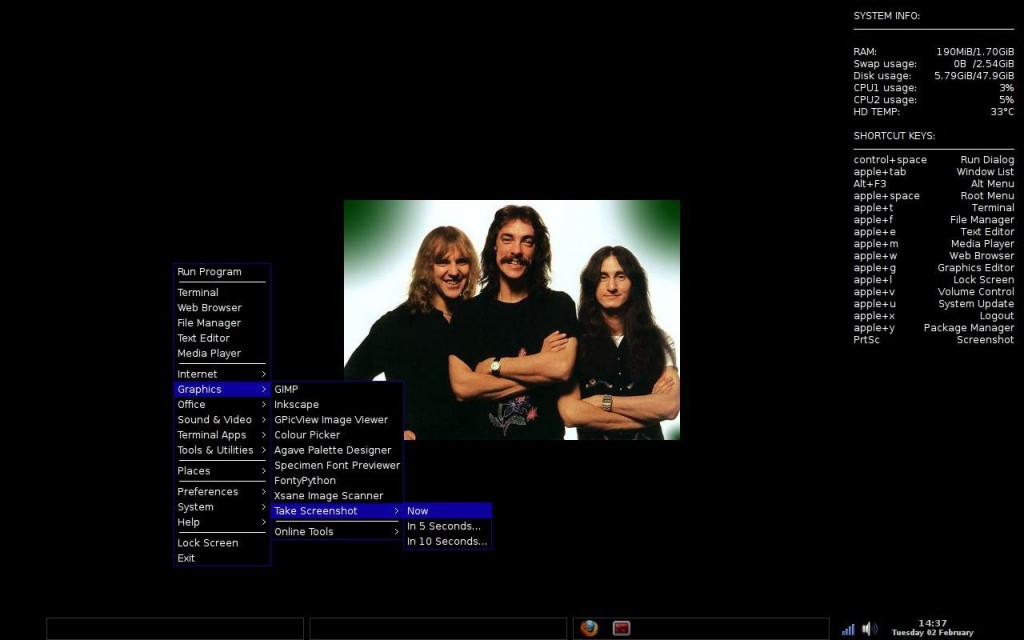
Screen Capture: Openbox in Crunchbang Linux

In the above picture we see the main “Desktop” interface with a circa 1970’s picture of the dudes from RUSH.  To the right, some keyboard shortcuts. At the bottom of the screen capture,  we see three (3) virtual desktops represented by the thin gray rectangles, and the System Tray with a few icons: (wifi-connect, volume) and the system clock.  Multiple (virtual) desktops can help you manage your computing tasks.  Most (if not all) applications allow you to “pin them” to all desktops. There are 2 advantages to “pinning” (if that’s the correct term).

  1. It allows you to run only one instance of an Application instead of “1 per desktop”.
  2. No need to scroll between desktops to access an app that you need to use instantly.

Openbox Desktop in Crunchbang

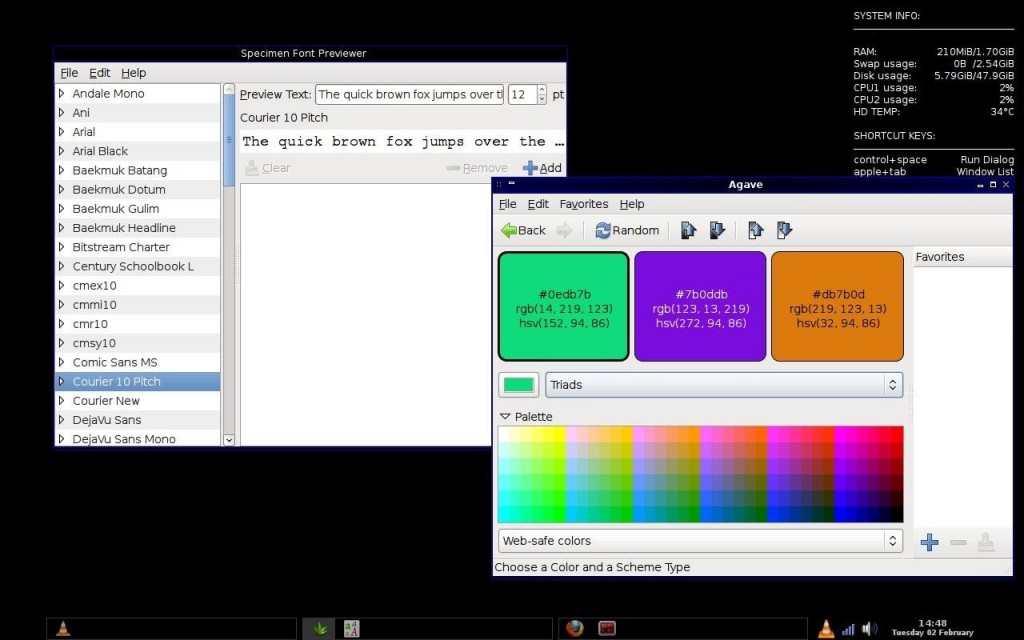
In the above picture we see some applications running.  When an application is running, you will usually see its icon within the rectangle that represents a specific virtual desktop.

One thing I like about Openbox is that when you launch an app, it’s default window position is the center of your screen.  This can be changed, but I like it, so I’ll keep it that way.

The above screenshot features a few applications one might use when designing a website.  “Agave” lets you preview color schemes.  Selecting colors that complement each other on a web site is really important.  You don’t want to create a visually-jarring website.

Also shown is the “Specimen” font previewer—good for general usage for viewing a font at various sizes.  Specimen even lets you type in your own arbitrary text.  Last but not least we see the “Terminator” terminal emulator that comes with the Crunchbang distro.

Because Linux is all about choice, you can choose any Desktop Environment you like, or even make up your own if you feel like doing so.

Categories
Applications Using Linux

Upgrade Firefox: Ubuntu-style Linux

Upgrade your Firefox web browser.

Found this great tutorial site for upgrading Firefox web browser in Ubuntu (and Ubuntu-style) Linux distributions.  I’ve linked to the category page, because (to date) the latest version mentioned is Firefox 3.5.5 and currently (as of 2nd February 2010) Mozilla has released version 3.6 for download.  Click the following link to Mozilla Firefox downloads page.

Why is “Ubuntu and Ubuntu-style” relevant here?  Because the tutorial that I found applies to the Linux distro that I’ve been using for a while.  It’s called “Crunchbang Linux” and it’s also known by it’s symbolic alias of #!more info on Crunchbang Linux at this link.  The tutorial was written with Ubuntu in mind but will also work on Ubuntu derivatives such as Linux Mint and others.

The tutorial has 3 easy steps—possibly even 2 steps—depending on whether or not you’ve already upgraded Firefox or not.  If you have upgraded, you’ll need to follow all 3 steps.  If not, then you’ll only need 2 steps.  Note, I do not count the step of moving the downloaded Firefox *.tar.bz2 file to your /home/userName directory as a step because it’s something you will have to do (or not do) depending on your Firefox download folder preferences.  Early versions of Firefox have a default setting of downloading all files to the /home/userName/Desktop folder, however, depending on the flavor of Linux you are running, it may choose the /home/userName/downloads folder.

Thanks again to Jaxov for the awesome tutorial.  Just follow this link (or the link at the top of this post) and then look for the highest Firefox version available.  You should also visit the Mozilla download link above to see if a later version is available.  The steps in the tutorial are similar (if not identical) for recent versions of Firefox, so even if you are downloading version 3.6 you can still follow the directions in the tutorial for 3.5.5 and it will work.

Categories
drive setup Installing Linux Using Linux Your Choice

Dual-boot Linux

What do we mean by “Dual boot” anyway?

Dual boot means that our computer has 2 (two) Operating Systems.  We choose which one to “Boot” into when the computer starts.

Many Linux users dual-boot as a way of sharing a computer.  This saves you money.  Why? Because you keep the computer you already own and install Linux on it.  I have dual booted with Windows XP and more recently, Mac OS-X Snow Leopard.  Since I don’t have a PC running Vista or Windows 7, this post will only discuss Win XP & Snow Leopard dual booting with Linux.

How to dual boot with Linux and Windows (or Mac)

There are many online tutorials available.  I won’t post a tutorial here because that would be  “reinventing the wheel”.  I will only describe the fine points.  If I’ve done my job, then the process might be less intimidating when it’s time to set up your dual-boot environment.

Dual booting with Windows and Linux

  • First things first.  If your computer already has Windows or Mac OS-X on it, then backup your documents.  While the process of dual-booting is better than it was years ago, things can still go wrong.  Don’t lose your files.  Be safe, not sorry.
  • If you’re running Windows XP (yes, I know this post may be outdated as we are already within the era of Windows 7) clean up your hard drive (junk files, temporary files) and then defragment.  It’s very important to defragment.  You don’t want documents and Windows Operating system files scattered all about the hard drive.
  • Open a web browser and get a cup of coffee or tea.  Why?  Because I think it’s a good idea now to view some online tutorial (with screenshots) about dual-booting.  You may even want to print out the pages of the tutorial so you can refer to them while performing the various steps involved with dual-booting.  The tutorial is easy to follow.

Dual booting with Mac OS-X and Linux

I recently purchased a MacBook and I wanted to dual-boot this machine.  Don’t get me wrong, I love the Mac OS-X.  There are just things that I needed to set up quickly that I’m still learning how to do under Mac OS-X.  Under Linux there are things that I’ve done enough times that it’s become second nature.  Here are some notes and suggestions.

  • To dual-boot Mac OS-X and Linux, you will be creating at least one partition on your hard drive.  It’s not hard to do.  Here’s a link to the tutorial that I used.
  • I suggest following the instructions in the tutorial.  It helped me set up my Mac OS-X and Linux dual boot machine very quickly.  Same approach as before; backup your documents, do a cleanup if necessary, and read the tutorial completely before performing the steps.
  • Pay extra attention to the bootloader installation step at tutorial’s end.  If you install the bootloader in the wrong place, things can break—badly.
  • Even though my MacBook is a 64-bit machine, I installed a 32-bit Linux distro.  I would recommend a 32-bit distro as it’s likely to be more stable for uses such as these.
  • The tutorial assumes that you’re running an Intel-based system (also called “mactel”).  Be sure that this is the case before following any tutorial.